Git Setup
Install Git
Git is a program used to track and share changes to files - it is ubiquitous in the world of software development. You will need to use git to track changes to your work on assignments. The instructions for this vary based on your platform:
Mac
Git should have been installed as part of the command line tools you already installed. Skip to configuring your identity. If you cannot run git, follow these instructions to install git manually on a Mac.
Linux
On Ubuntu and other apt-based distros, run this command in a terminal:
sudo apt install git
For other distros, refer to these instructions to install git on linux.
PC
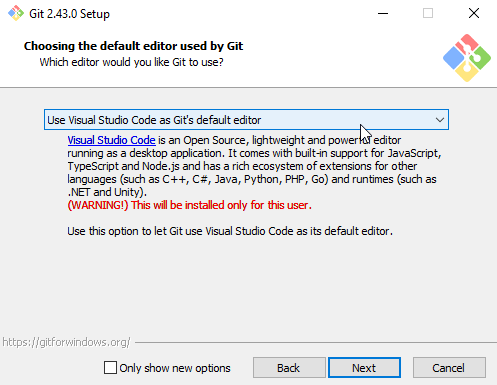
Download the 64-bit Git for Windows Setup installer from the Windows git download page.
Run the installer. Accept all the default options, but when you get to the screen asking what text editor to use as the default make sure that Visual Studio Code is selected:
Configuring your identity
Once git is installed, you will need to introduce yourself. Open a
command prompt and run the following commands (replace YOUREMAIL and
YOURNAME with appropriate values).
git config --global user.email "YOUREMAIL@my.chemeketa.edu"
git config --global user.name "YOURNAME"
You will only need to do this once as part of installing git.
This step also constitutes testing your git installation—if, when you try
to run git, you get an error saying something like git is not recognized as a command, you do not have it installed correctly.
To verify the settings, do this and look for the values listed for user.name
and user.email:
git config --list
If you don't have this configuration done correctly, you might see later on that your work history gets ‘staged changes’ rather than new commits, which means your work log is not being kept.
You likely now want to continue to the Local Development Guide to set up a local project and test out building and running a program.