Little Computer
General
- All submissions must include a work history to be worth credit.
- Submit all files to Canvas. Make sure to name file(s) EXACTLY as specified - including capitalization.
- Make sure your program accepts input in EXACTLY the order and format given.
Do not ask for extra input or change the order of inputs.
If you want to make an expanded version of a program that and get feedback on it, email it to me or show me in class. - Slight variations in output wording/formatting are usually fine
(as long as formatting isn't part of the assignment).
If you do not get the right final output, print out some evidence of the work your program did to demonstrate your progress. - Readability and maintainability of your code counts. Poor formatting, confusing variable names, unnecessarily complex code, etc… will all result in deductions to your score.
Objective
Upon completion of this assignment the student will be able to create classes to represent complex data types.
Background
For this assignment, you are going to implement a version of the Little Computer - a very simple model of how machine level code works.
If you took CS160, you have already seen a Little Computer simulator. If not, you should start by reading about it in the Welcome to CS textbook.
You can use the simulator from that book to get a feel for how the Little Computer works. The only key difference is that we will not be implementing the input/output instructions (901, 902).
Setup
You should use a Unit Test Project Template (or a Combo Project Template and only worry about the unit test program) in either a codespace or a local development environment to do this assignment.
While working on this assignment, MAKE sure that you are generating a worklog with time stamped entries.
Update tests.cpp to have the unit testing code from
tests.cpp.
Then add these two files:
LittleComputer.hLittleComputer.cpp
Some starter code is provided for LittleComputer.h in this file:
LittleComputer.h. Copy and paste that code into your LittleComputer.h file.
The LittleComputer.cpp file you will write from scratch. It will need to import LittleComputer.h, so start by adding that to the file.
In your Makefile, add LittleComputer.cpp to the SHARED_FILES variable and LittleComputer.h to the HEADERS variable. It should end up looking something like this:
...
HEADERS = LittleComputer.h
...
SHARED_FILES = LittleComputer.cpp
...
You will NOT be able to build and run your code until you have implemented at least a few of the functions for the LittleComputer class. See below.
Implementation
You will be implementing the class LittleComputer shown in the UML diagram below.
You should build the code incrementally and test as you go. The instructions below will get you started.
Initial Compile
Before you start implementing the code, you want to make sure that you can
build and test your code against at least the first test in tests.cpp.
(It is uncommented, the rest are commented out.)
You will need to at least implement the default (no argument) constructor
and the two getter functions getProgramCounter() and getAccumulator()
to get this to compile and run. Make sure to also add Doxygen style comments
to those functions.
You will also want to set up the member variables for the class. Use the UML diagram and the descriptions below to determine what member variables you need.
To build against the tests, you must use the function prototypes exactly as shown in the UML. (The interface of the class must match.)
However, you can change the names and even the types of the member variables if you want (the implementation of the class is up to you). That said, the provided UML is a good guide for what variables you need.
Completing the Class
Once you have the initial compile working, you can move on to implementing
the rest of the class. Uncomment the next test case in tests.cpp and
implement the corresponding function in your .h/.cpp files. Make sure to
provide Doxygen style comments for each function you implement.
Repeat this process until all test cases are uncommented and passing.
Leave all test cases that build uncommented, even if they fail. A failed test is better than a commented out test - it shows that the function is there and being tested.
If you get stuck on a function, and can't even get that test to compile, comment it back out and move on to the next one.
Implementation Notes
Variables
Memory stores the instructions and data for the Little Computer. It should be implemented as a vector of integers.
The programCounter or PC represents the instruction that will be executed
next. i.e. if the programCounter is 1 and the computer does a step, the
instruction at 1 will be executed. This should start at 0. It is listed
as a size_t since it is always non-negative. You could implement it
as an int if you prefer, but you will need to do some type casting to avoid
warnings/errors when using it as an index into the memory vector.
The accumulator will store the value of the most recent computation done by the Little Computer. It should also start at 0.
If you add any other variables, make sure they do not duplicate existing information or anything that can be determined from existing information.
Functions
Below are descriptions of what the functions should do to pass the tests.
constructor (no parameters)
Initializes accumulator (ACC), program counter (PC). Memory can be set to an empty vector or a vector with a fixed size (e.g. 100) initialized to 0.
constructor (vector parameter)
Initialize memory to be a copy of the provided program.
The accumulator and program counter should be initialized to 0.
The parameter for this probably should be a const vector<int>& and not a plain vector, but you can implement it either way. UML will not include details like const or &
getProgramCounter / getAccumulator
Return the value of program counter or accumulator.
getMemoryAt
Return the value in memory at the indicated location. (We are using a size_t parameter
to represent memory locations since they are always non-negative.)
getCurrentInstruction
Return the value in memory at the location indicated by the program counter.
isHalted
Returns true if the current instruction is 0, otherwise false
step
Asks the LittleComputer to run the current instruction (the one indicated by the program counter). Instructions for the little computer are numbers - those numbers should be interpreted as shown in this diagram:
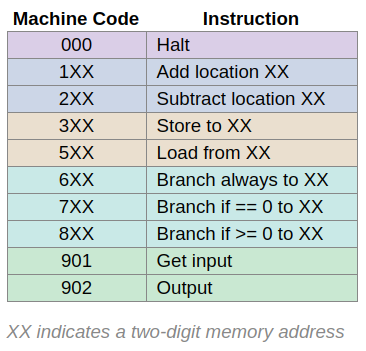
For example, 102 means "add the value from location 2 to the accumulator".
After running any instruction except a halt or successful branch, the program counter should increase by 1.
Here are some tips:
- 000 in that chart is the same as 0. Nothing should happen when this is run - the computer will stay at the same instruction and do nothing.
- The 100's digit always indicates the basic operation.
- The next two digits specify a memory address (xx) the instruction will use
- add / subtract take the value at a memory address and add to or subtract from the accumulator. e.g. "104" says add the value at memory address 4 to the value that is already stored in the accumulator. It does NOT mean add the number 4.
- store copies the accumulator value into the memory address specified by XX, while load copies the value at the memory location XX to the accumulator (replacing the old value)
- 6XX branch always changes the program counter to hold the value in XX. The program counter does not increase by 1 after that.
- 7XX branches if 0 must test the value in the accumulator. If it is 0, do the branch (by changing the program counter to XX). If the accumulator has a non-zero value, the LittleComputer does not branch and just moves on to the next instruction (increase program counter by 1).
void restart()
Resets the accumulator and program counter to 0 but leaves memory unchanged.
Submission
Submit file: project.zip
See the codespace guide for instructions on how to create a .zip file of your project.
Extra Challenge (optional, not extra credit)
Create a simple main program (in main.cpp) that repeatedly steps through a program until it halts, printing out the state of the LittleComputer (PC, ACC, current instruction, memory contents) after each step, until the program halts. You may want to implement the 901/902 step instructions as part of this. You might also want to add a function the the LittleComputer class to print out its current state.