Grayscale Image
General
- All submissions must include a work history to be worth credit.
- Submit all files to Canvas. Make sure to name file(s) EXACTLY as specified - including capitalization.
- Make sure your program accepts input in EXACTLY the order and format given.
Do not ask for extra input or change the order of inputs.
If you want to make an expanded version of a program that and get feedback on it, email it to me or show me in class. - Slight variations in output wording/formatting are usually fine
(as long as formatting isn't part of the assignment).
If you do not get the right final output, print out some evidence of the work your program did to demonstrate your progress. - Readability and maintainability of your code counts. Poor formatting, confusing variable names, unnecessarily complex code, etc… will all result in deductions to your score.
Background
The most common way to store image data is as a "bitmap" - a 2D grid of numbers representing the color of each pixel or square in the image. In a grayscale image (what people would normally refer to as black and white) the value of each pixel is typically stored as a number between 0 for black and 255 for white.
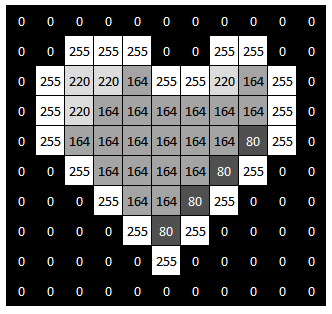
Here is the same image (a heart) shrunk down:

Your task is to make a class that represents a grayscale image. A GrayscaleImage
will track its width and height (which will be fixed at creation) and an array of
pixels which will be stored as the data type uint8_t. A uint8_t is an "unsigned
8-bit integer" data type. It is like an int but it can only hold the values 0-255
(all the unsigned values you can represent with 8 bits).
The array of pixels you store will be a 1D array as there is no clean way to
dynamically allocate a 2D array in C++. Fortunately, it is easy to map a 2D array
with dimensions [ROWS][COLS] onto a 1D array with size [ROWS * COLS]. The image
below shows how a 2x3 2D array corresponds to a 6-element 1D array:
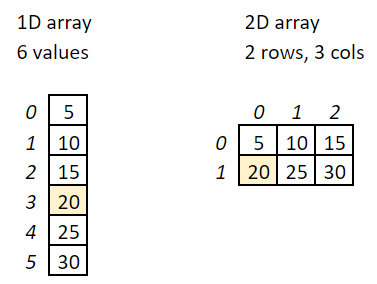
Notice that the entire first row of data from the 2D structure comes first in the 1D
array, then all the data from the second row of data, then (if it exists) the third row...
Because of this, you can calculate the correct location [r][c] in the 2D structure
as [r * COLS + c] in the 1D structure, where COLS is the number of columns. For
example: the yellow highlighted cell is at [1][0] in the 2D array and there are 3
columns. So to find the same value in the 1D array we can calculate [1 * 3 + 0] => [3].
To manage this, we will use helper functions uint8_t getPixel(int row, int col) const
and void setPixel(int row, int col, uint8_t brightness) to get and set pixel values.
These functions will use the above logic to calculate the correct location in the 1D array
to read or write a pixel value.
Assignment Instructions
Setup
You should use the Combo Project Template in either a codespace or a local development environment to do this assignment.
While working on this assignment, MAKE sure that you are generating a worklog with time stamped entries.
Update your test.cpp file using this provided tests.cpp.
- GrayscaleImage.h : You should not modify this file.
- GrayscaleImage.cpp : This has a bit of starter code, but you will need to add the implementations for all the other functions declared in GrayscaleImage.h.
In your Makefile, make sure to list GrayscaleImage.h in the HEADERS variable and GrayscaleImage.cpp and tests.cpp in the TEST_FILES variable. It should look something like this:
...existing content...
HEADERS = GrayscaleImage.h
...existing content...
SHARED_FILES = GrayscaleImage.cpp
...existing content...
Unless you want to do the optional fun at the end, you will only use the unit test
project portion of the template for this assignment.
You can ignore main.cpp and the program.exe.
Requirements
You should not modify GrayscaleImage.h. You should only modify tests.cpp to comment out entire TEST_CASEs that do not compile with your code or that cause a crash. Do not modify a TEST_CASE in any way except to comment the entire thing out. Leave in any TEST_CASES that compile and run, even if they fail.
Passing Test > Failing Test > Commented-Out Test > Does not Compile
Getting Started
Comment out all the tests but the first one in tests.cpp. Implement the constructor and work until you pass test 1. Then, work on one new test at a time, implementing only the new functions needed to pass that test.
Memory Management
Make sure to test your code for leaks or other memory errors with Valgrind (or leaks on a Mac).
Test early and often. It will be much easier to find and fix memory issues write after you write the relevant code than if you wait until you have written all the functions and then test with Valgrind (or leaks on a Mac) for the first time. Valgrind should give your program a clean bill of health. Any errors reported by Valgrind will result in a significant deduction, even if the program appears to work fine despite of them.
In particular, watch out for memory leaks. Memory leaks will not cause any visible errors in your program—the only way to know that you have a leak is to use Valgrind (or run your code long enough that you can measure a steady increase in used memory).
Remember, Valgrind shows you where it detected an issue. Often, the place where you caused the issue is somewhere else! For example, maybe your constructor did not allocate an array but that was not a problem until later when you went to write to that array.
Function Tips
Here is a guide to function implementations. They are provided in a suggested implementation order.
A uint8_t (unsigned, 8-bit integer) only holds values from 0-255. You can freely
copy a uint8_t into an int, but if you want to copy an int into a uint8_t
without warnings, you need to do something like:
int x = 200;
uint8_t pixel = static_cast<uint8_t>(x);   //trust me, I know x is going to fit into pixel!
GrayscaleImage::GrayscaleImage(int heightVal, int widthVal)Our basic constructor — it should create a GrayscaleImage with the given dimensions and allocate an array big enough to hold width * height number of
uint8_ts. The array should be initialized to all 0's (black).GrayscaleImage::setPixel(int row, int col, uint8_t brightness)Set the pixel at the given coordinates to the given brightness value. Should use logic similar to
getPixelto calculate the correct location in the 1D array to set.GrayscaleImage::fill(uint8_t brightness)Set every pixel of the image to the given brightness value.
string toString() constThis function will mostly be useful for debugging purposes. While troubleshooting, you can use it to print out an image using something like:
cout << image.toString();Read the .h for expected format. Your output must have a
\tafter each pixel and a\nat the end of each row. You will want to useto_string(num)to convert numbers to strings.bool operator==(const GrayscaleImage& other) constChecks to see if two images are exactly the same. (Same width, height, and pixel values).
Warning: you can't just compare the
pixelsarrays themselves with==; that will compile, but it will just compare the memory addresses of the two arrays. You need to loop through thepixelsto compare the individual values.~GrayscaleImage()Destructor. Not tested directly—but every test will leak memory without this. Verify it works by running your program with Valgrind (or leaks on a Mac).
GrayscaleImage(const GrayscaleImage& other)andGrayscaleImage& operator=(const GrayscaleImage& other)Copy constructor and assignment operator. Tested in two unit tests. These are another big area for memory issues — test with Valgrind (or leaks on a Mac)!
The tests for many other functions will rely on the copy constructor. You need to get it working before finishing most of the rest of the assignment.
The rest of the functions needs to make a new GrayscaleImage
that will be returned. However, just because you are making a new object
does not mean you need to use the new keyword.
Allocate the "new" objects on the stack as local variables
and return them.
GrayscaleImage::someFunction() {
    // Not desired  - allocates object on the heap.
    // Caller would have to manage that memory
    // GrayscaleImage* newImage = new GrayscaleImage(10, 10); // No!!!

    // A "new" GrayscaleImage allocated on the stack
    GrayscaleImage newImage(10, 10);  // Yes
    ... // do things to newImage
    return newImage;  // return a copy of newImage
}
GrayscaleImage manages a dynamic array so other code doesn't need to
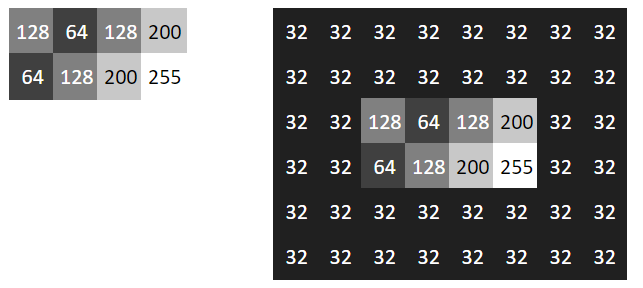
worry about calling new or delete.GrayscaleImage addFrame(int padding, uint8_t brightness) constThis should make a new GrayscaleImage that is a copy of this one but has a "frame" of extra pixels around it on each side. The original image will NOT be modified.
paddingdescribes how many pixels worth of frame should surround the contents of the original image andbrightnessthe color value to give them.Here is what it might look like after applying (right side) a frame with 2 padding and a brightness of 32 to what originally was a 2x4 image (left side).
Tip: You can use the
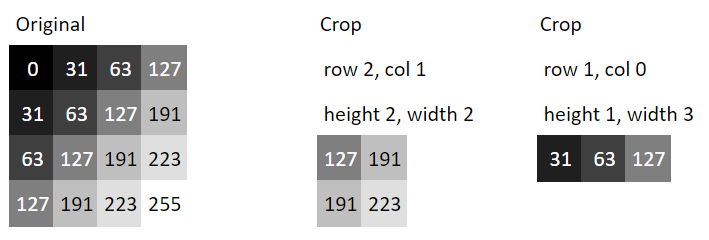
fillfunction to set all the pixels of the new image to the frame color value before copying over the pixels from the original image.GrayscaleImage crop(int startRow, int startCol, int newHeight, int newWidth) constGet a new GrayscaleImage that contains a "crop" from this image (don't actually modify the original). The crop should copy pixels starting from
startRowandstartColinto a new image that isnewHeightbynewWidth.Here are some sample crops of a 4x4 image:
There is a second test for this function to add error handling. If the crop is impossible because the pixels we would have to copy go outside of the boundaries of the original image, either by starting from a negative value or extending past the
widthorheight, throw anout_of_rangeexception.
Submission
Submit file: project.zip
See the codespace guide for instructions on how to create a .zip file of your project.
Optional Fun
The code you wrote can be used to work with real images. We just need some extra code to
read and write the actual .bmp format used by real images. That code is provided in
ImgIO.h and
ImgIO.cpp.
Download them and add them to your project.
Then update the HEADERS and PROGRAM_FILES lines in the Makefile to list all of the .h and.cpp file.
Replace the code in main.cpp with this
main.cpp code.
Finally, add this cat.bmp file ( cat credits wikimedia commons) to the project's working directory and run it.
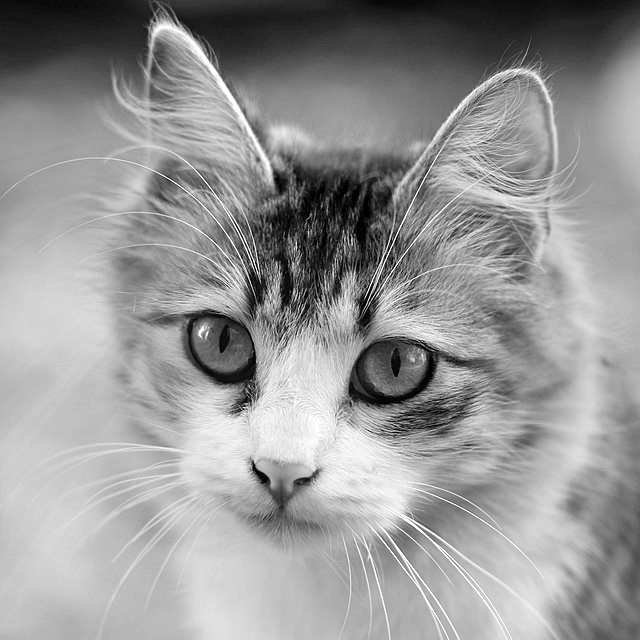
It should use your code to modify the cat picture in various ways!